A high-quality sitemap helps search engines like Google and Bing understand the structure of your website and efficiently crawl your content.
It enhances the chances of all your important pages being indexed, improving your SEO and helping you rank higher in search results.
Here’s a step-by-step guide to building a high-quality sitemap:

Step 1: Understand the Types of Sitemaps
There are two main types of sitemaps:
- XML Sitemap: This is the most common type and is specifically designed for search engines. It lists all the important URLs on your site, helping search engine bots crawl your content more efficiently.
- HTML Sitemap: This is more user-friendly and designed for visitors to easily navigate your site. It lists key pages in an organized manner, helping users find what they’re looking for quickly.

Step 2: Prioritize Pages for the Sitemap
Not all pages need to be in your sitemap. Focus on:
- Important pages: Include the pages that are essential for your website, such as blog posts, key service pages, category pages, and other high-traffic areas.
- Excluding unimportant pages: Filter out pages that don’t provide SEO value, like admin or login pages, duplicate content, or pages marked as “noindex.”
- High-quality content: Pages that provide valuable information and are well-optimized for SEO should be included to enhance visibility.
Step 3: Create the Sitemap
You can create an XML sitemap manually or use tools that automate the process. Here are some methods:
- Using a CMS Plugin (e.g., WordPress)
If you’re using WordPress, there are several plugins that can automatically generate an XML sitemap for you. The two most popular ones are:
- Yoast SEO: This plugin automatically creates a sitemap for your website and updates it whenever new content is added.
- Google XML Sitemaps: This plugin specifically focuses on generating XML sitemaps and is easy to configure.
- Manual Creation (For Non-CMS Sites)
If your site isn’t using a CMS like WordPress, you can manually create a sitemap:
- Create an XML file: Use a text editor (like Notepad or Sublime Text) to create an XML file with a structure like this:
xml
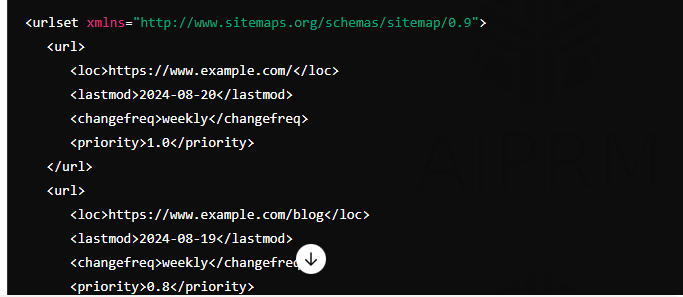
- Loc: This is the URL of the page.
- Lastmod: The date when the page was last modified.
- Changefreq: How often the page is updated (daily, weekly, monthly).
- Priority: Ranges from 0.0 to 1.0, indicating the importance of the page (1.0 being the highest).
- Using Sitemap Generators
There are tools and generators available that can automatically create a sitemap for you, such as:
- XML-sitemaps.com: Allows you to enter your site’s URL, and it generates a sitemap.
- Screaming Frog SEO Spider: This desktop program crawls your site and generates an XML sitemap that can be exported.
Step 4: Organize the Sitemap Properly
Ensure your sitemap is structured properly:
- Limit to 50,000 URLs per sitemap: If your website is large, create multiple sitemaps and use a sitemap index file to link them.
- Use logical groupings: For example, group blog posts under a /blog/ directory and services under a /services/ directory.
- Update frequently: Ensure your sitemap reflects the current structure of your website. When adding new pages or posts, update the sitemap automatically using plugins or tools.

Step 5: Submit the Sitemap to Search Engines
Once your sitemap is ready, you need to submit it to search engines to help them crawl your site.
Google Search Console
- Sign in to Google Search Console.
- Go to the Sitemaps section under Index.
- Enter your sitemap URL (e.g., https://www.example.com/sitemap.xml).
- Click Submit.
Bing Webmaster Tools
- Sign in to Bing Webmaster Tools.
- Go to the Sitemaps section.
- Enter your sitemap URL.
- Submit it for indexing.
Step 6: Monitor Your Sitemap’s Performance
After submitting the sitemap:
- Check indexing status: Regularly monitor Google Search Console or Bing Webmaster Tools to see how well your pages are being indexed.
Fix errors: If any errors appear, such as pages not being indexed, ensure that the sitemap is formatted correctly and that the robots.txt file isn’t blocking important
Step 7: Maintain and Update the Sitemap
- Regular updates: Ensure that your sitemap is always up to date with any new content or structural changes. Use tools or plugins that automatically update the sitemap whenever new posts or pages are published.
- Remove outdated URLs: If you delete pages or posts, remove them from the sitemap to avoid returning 404 errors.
- Review priorities: Periodically review the priorities assigned to pages and adjust them based on new business goals or content strategies.
Best Practices for a High-Quality Sitemap:
- Prioritize important pages: Focus on pages that provide the most value and are most likely to rank in search engines.
- Use canonical URLs: Avoid duplicate content by specifying canonical URLs in your sitemap.
- Use the correct formatting: Ensure the sitemap follows XML standards and includes only valid URLs.
- Avoid 404 errors: Ensure all URLs in your sitemap are active and do not return a 404 (page not found) error.
- Regular updates: Set a schedule for reviewing and updating your sitemap, particularly when you add new content.
Conclusion:
How to Build a High-Quality Sitemap for Your Blog
Building a high-quality sitemap is essential for SEO and helps search engines discover and index your content effectively.
By following these steps, you ensure that your sitemap is comprehensive, well-organized, and regularly maintained, maximizing your blog’s visibility and traffic potential.